Presentation
Advanced Search 5 is the most powerful filter navigation module available for PrestaShop. It will answer one of the major issues for e-merchants: increasing the conversion rate.
The module allows you to set up one or more efficient and effective filter navigation blocks anywhere on your site. It allows you to define the search perimeter (current context, entire catalog, …) and to fully customize each filter block (called “search engine”).
General Points and Operating Principles
Filter navigation is a tool that allows site visitors to display products based on criteria they define themselves, such as color, price or features.
This system saves them time in searching and selecting the products they are looking for.
The module allows you to easily and quickly add custom filters on the pages of your choice, offering your visitors a precise view of your catalog products.
Your customers will be able to quickly browse your store and see only the products most relevant to their needs, maximizing your conversion rate.
Configuration
A- Add New Search Engine
![]()
This allows you to access a pane where you can create a search engine.
I- General Settings
1) Titles
![]()
This allows you to set the title for the search instance. This title will be displayed above the criteria selection pane.
![]()
This allows you to set a private name for your tracker. This name will only be used to identify your search instances in your back office.
2) Behavior
This allows you to set the type of search that you want to create.
You have a choice of 3 options:
– Filter: with this type of search, you can combine several criteria dynamically in order to refine your results.
– Full Catalog
This allows you to activate or deactivate context search. If you activate context search, the products available on the page the visitor is currently viewing will be included in the search. If you deactivate context search, all the products in the catalog will be included in the search.
This allows you to set the level at which the search must be carried out.
You can enter a fixed category or use the category that your visitor is viewing as the search base.
This allows the search to go through the sub-categories for the category used, in order to include the products they contain in the search results.

This allows you to only search products that are in stock.
II- Search Block Settings
1) Block
This allows you to set the position where the search instance will be shown.
You can choose from among the main PrestaShop hooks.
You can also choose to place the search instance in a custom position (advanced user), by inserting the code provided in the desired location in your template.
This allows you to set the post method for the search. There are two different post modes:
– Instant search (modification): this mode launches a search each time a criterion is modified.
– Search on submit (button): this mode allows you to select your criteria freely. The search will not be launched until you click Search.
This allows you to show the number of results found.
This allows you to display the criteria selected for the search displayed.
This allows you to activate automatic scrolling for the results when the search is complete.
This allows you to prioritise a search instance. The module will therefore hide the search instances that do not have this option set to yes on a page that has several search boxes.
2) Groupes de critères
This allows you to show a button that allows your visitors to reset all the search criteria.
This allows you to hide criteria groups that do not comprise any items for the current selection.
This allows you to hide criteria groups that do not have any effect on the results.
3) Criteria
This allows you to show the number of product matches found next to each Criterion.
This allows you to choose to show criteria that do not lead to any products.
This selector allows you to choose the method the visitor may use to display the criteria that exceeds the size of the container block for the group.
III- Search Results Settings
This allows you to set the CSS selector which allows Advanced Search to be placed in the central column.
This allows the image for the combination obtained by the search to be automatically selected and displayed.
This allows the system to pre-select the combination found by the search when the user lands on the product sheet.
This allows you to set the maximum number of products to be displayed per page of results.
This allows you to set the sort criterion for the results. You can choose to sort by name, price, position of the products in their respective categories, manufacturer, quantity currently in stock, date added or date modified.
We recommend that you sort by date added and date modified for large catalogs.
This allows sort the search results in ascending or descending order.
This allows you to show or hide the category descriptions on the category pages during a search.
Description to be Displayed Above the Results
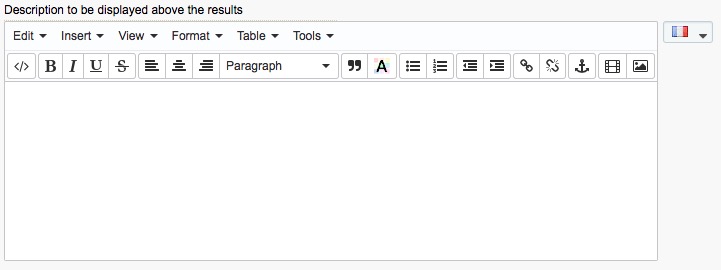
This allows you to enter a description for the search instance. This shall be displayed above your search results.
B- Search engine management
I- Search engine edit
![]()
This allows you to edit the current search button. The form is identical to that for creation
II- Visibility
![]()
The following options allow you to set the pages on which the search engine must be displayed. Leave these set to no to show your search engine on all the pages on your shop.
1) Restrict Search to Categories
![]()
This allows you to restrict the display of this search engine to specific Category pages.
2) Restrict Search to Products
By selecting products
![]()
This option allows you to restrict the display of this engine to specific product pages by selecting the relevant products.
By selecting the parent categories
![]()
This option allows you to restrict the display of this engine to specific product pages by selecting the parent categories. The search engine will be displayed on all product pages that belong to the selected categories.
3) Restrict Search to Manufacturers
![]()
This allows you to restrict the display of this search to specific manufacturer pages.
4) Restrict Search to Suppliers
![]()
This allows you to restrict the display of this search to specific supplier pages.
5) Restrict Search to CMS pages
![]()
This allows you to restrict the search to be displayed on CMS pages only
6) Restrict Search to Special Pages
![]()
This allows you to restrict the search to be displayed on special pages, such as the cart or the forgot password pages.
III- Status
![]()
This allows you to activate or deactivate the current search engine.
IV- Delete
![]()
This allows you to delete the current search engine.
V- Duplicate
![]()
This allows you to create a copy of the current search engine.
VI- Re-Index
![]()
This allows you to launch re-indexing.
Re-indexing is the process during which Advanced Search updates all the criteria groups for the search engine, along with their values.
e.g. if you edit the values for an attribute, you will have to re-index the module engine so that it takes the modifications into account.
C- Available Criteria Groups
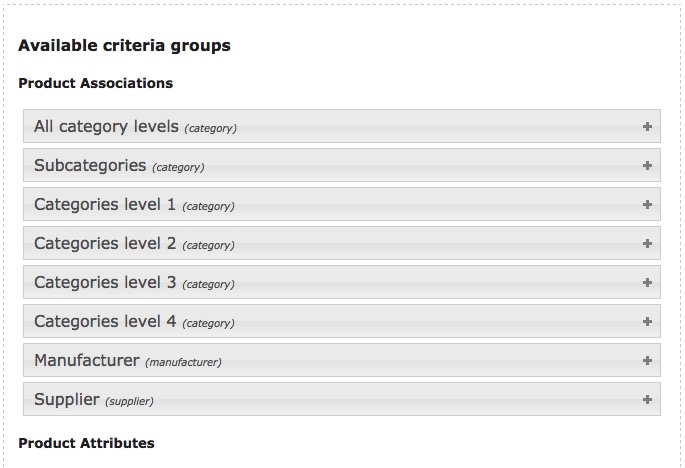
This column contains all the criteria groups that are available in your shop and can be added to your search engine.
They are sorted by type: attributes, features and associations, etc.
Just click a criteria group to add it to your search engine.
I- Active Criteria Groups
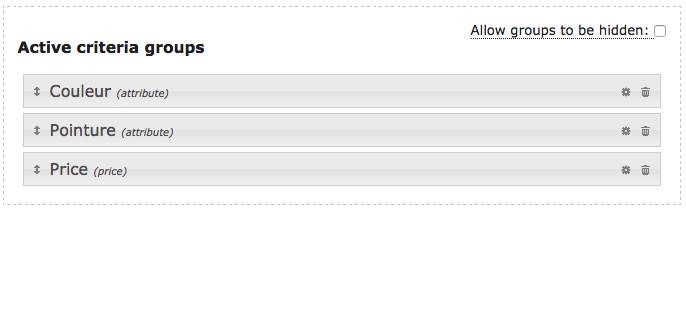
This column contains the criteria groups that are currently used for your search engine. This is where you can edit or delete them.
The order of the criteria groups in this list defines the order in which they are displayed on your shop.
Just click and drag a group to change the order.
II- Editing a Criteria Group
1) Criteria group of type “Product Associations”
This allows you to set the name to be used for this criteria group.
You can set one name for each language that has been installed on your shop.
This name will be displayed above the group criteria
This allows you to set the type of selector to be used for this criteria group.
This allows you to take the previous category or categories selected into account when displaying the next category level (only available on Categories Level X criterion groups)
e.g.
You have the following tree structure: A level 1 category, title 1 and content 3 sub-categories A, B and C and a level 2 category, title 2, also containing 3 sub-categories, D, E and F.
You have created two criteria groups: one for level 1 categories that you have configured as needed and a second one for level 2 categories, for which you have activated the Show Sub-Categories Directly Associated with the Criteria Previously Selected option.
Then go to your shop and select category 1 for the first criteria and only criteria A, B and C will be available for group 2.
This allows you to provide a search box in your drop-down menu so as to allow the values it contains to be filtered.
This allows you to authorise your customers to select multiple values for this criteria group.
This allows you to set the maximum number of criteria to be shown for this criteria group. Enter 0 to show as many criteria as there are values for the group.
This allows you to set the start point for the tree structure for the categories to be displayed.
2) Criteria group of type “Product Attributes”
This allows you to set the name to be used for this criteria group.
You can set one name for each language that has been installed on your shop.
This name will be displayed above the group criteria
This allows you to set the type of selector to be used for this criteria group.
This allows you to authorise your customers to select multiple values for this criteria group.
This allows you to set the text for the All option, i.e. the default option in a drop-down menu.
This allows you to set the maximum number of criteria to be shown for this criteria group. Enter 0 to show as many criteria as there are values for the group.
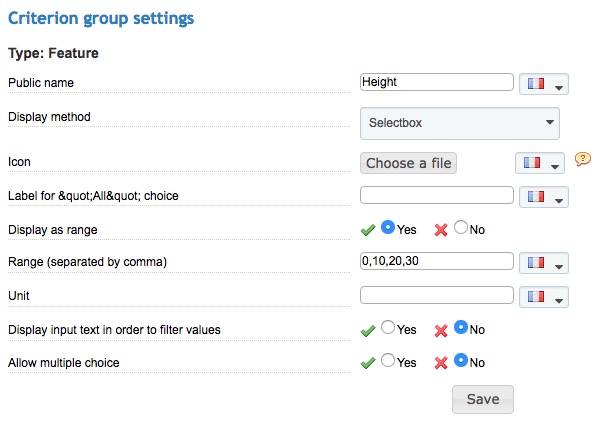
This allows you to display the attributes as ranges.
Activate this option to gain access to Range and Unit options. The first one allows you to generate comma-separated numerical tiers for your choices.
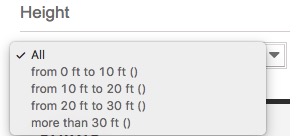
The Unit option allows you to set the unit of measurement for your criteria. This unit will be automatically added to the end of each value.
Example :
This allows you to provide a search box in your drop-down menu so as to allow the values it contains to be filtered.
This allows you to set the step for your cursor or numerical interval. This value will be applied for each deviation between two group values.
The step must be consistent with the values in the group. Too great a step for the criteria may provoke display inconsistencies.
This allows you to set the measurement unit for your criterion. This value will be automatically added to the end of each value.
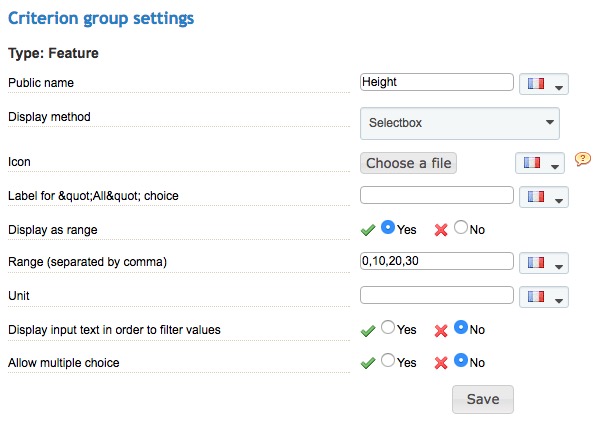
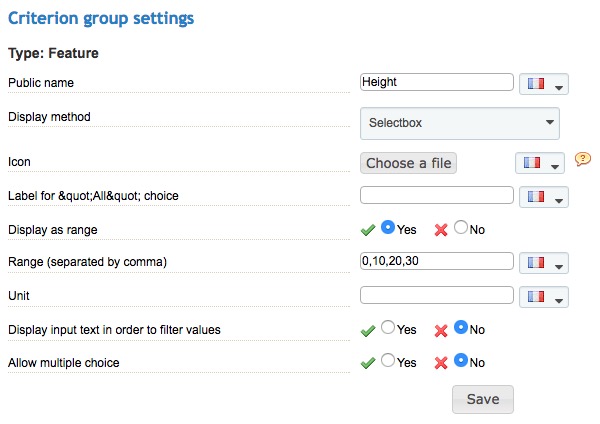
3) Criteria group of type “Product Features”
This allows you to set the name to be used for this criteria group.
You can set one name for each language that has been installed on your shop.
This name will be displayed above the group criteria
This allows you to set the type of selector to be used for this criteria group.
This allows you to set the text for the All option, i.e. the default option in a drop-down menu.
This allows you to display the attributes as ranges.
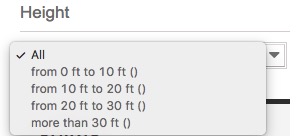
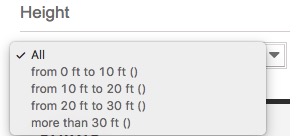
Activate this option to gain access to the Range and Unit options. The first one allows you to generate comma-separated numerical tiers for your choices.
The Unit option allows you to set the unit of measurement for your criteria. This unit will be automatically added to the end of each value.
Example :
This allows you to provide a search box in your drop-down menu so as to allow the values it contains to be filtered.
This allows you to authorise your customers to select multiple values for this criteria group.
This allows you to set the maximum number of criteria to be shown for this criteria group. Enter 0 to show as many criteria as there are values for the group.
This allows you to set the step for your cursor or numerical interval. This value will be applied for each deviation between two group values.
The step must be consistent with the values in the group. Too great a step for the criteria may provoke display inconsistencies.
This allows you to set the measurement unit for your criterion. This value will be automatically added to the end of each value.
4) Criteria group of type “Product Properties”
This allows you to set the name to be used for this criteria group.
You can set one name for each language that has been installed on your shop.
This name will be displayed above the group criteria
This allows you to set the type of selector to be used for this criteria group.
This allows you to set the text for the All option, i.e. the default option in a drop-down menu.
This allows you to authorise your customers to select multiple values for this criteria group.
This allows you to set the maximum number of criteria to be shown for this criteria group. Enter 0 to show as many criteria as there are values for the group.
This allows you to provide a search box in your drop-down menu so as to allow the values it contains to be filtered.
This allows you to display the attributes as ranges.
Activate this option to gain access to the Range and Unit options. The first one allows you to generate comma-separated numerical tiers for your choices.
The Unit option allows you to set the unit of measurement for your criteria. This unit will be automatically added to the end of each value.
Example :
This allows you to set the step for your cursor or numerical interval. This value will be applied for each deviation between two group values.
The step must be consistent with the values in the group. Too great a step for the criteria may provoke display inconsistencies.
This allows you to set the measurement unit for your criterion. This value will be automatically added to the end of each value.
5) Criteria group of type “Product Package”
This allows you to set the name to be used for this criteria group.
You can set one name for each language that has been installed on your shop.
This name will be displayed above the group criteria
This allows you to set the type of selector to be used for this criteria group.
This allows you to set the text for the All option, i.e. the default option in a drop-down menu.
This allows you to display the attributes as ranges.
Activate this option to gain access to the Range and Unit options. The first one allows you to generate comma-separated numerical tiers for your choices.
The Unit option allows you to set the unit of measurement for your criteria. This unit will be automatically added to the end of each value.
Example :
This allows you to provide a search box in your drop-down menu so as to allow the values it contains to be filtered.
This allows you to authorise your customers to select multiple values for this criteria group.
This allows you to set the maximum number of criteria to be shown for this criteria group. Enter 0 to show as many criteria as there are values for the group.
This allows you to set the step for your cursor or numerical interval. This value will be applied for each deviation between two group values.
The step must be consistent with the values in the group. Too great a step for the criteria may provoke display inconsistencies.
This allows you to set the measurement unit for your criterion. This value will be automatically added to the end of each value.
6) Create New Custom Criterion
This allows you to set the title for your new custom criterion.
This allows you to set a color for your new custom criteria.
7) Sort Criteria
This allows you to set the order for the criteria displayed in a criteria group.
There are 4 possible sort orders:
– Custom Position: this allows you to manually set the sort order by dragging and dropping the criteria to the desired position.
– Alphabetical: this allows you to set an alphabetical sort order.
The order defined here shall be that used in the front office
This allows you to choose the order for the criteria.
You can choose ascending or descending.
The sort direction for a custom position will invert the current order
Advanced Search allows you to group several criteria under a single custom criterion.
Let’s take a group color criterion, for example. The shop has several variants for each color, but you do not want to display all of them. We are therefore going to create a custom criterion for each of the colors to be represented, then allocate all the variants to this new criterion.
To do this, go to the edit window for a Color criteria group, then create a custom criterion.

Enter its name and enter a color for the new criterion, then save it.
Now go to the list of criteria that now contains a new column:Link to Custom Criterion
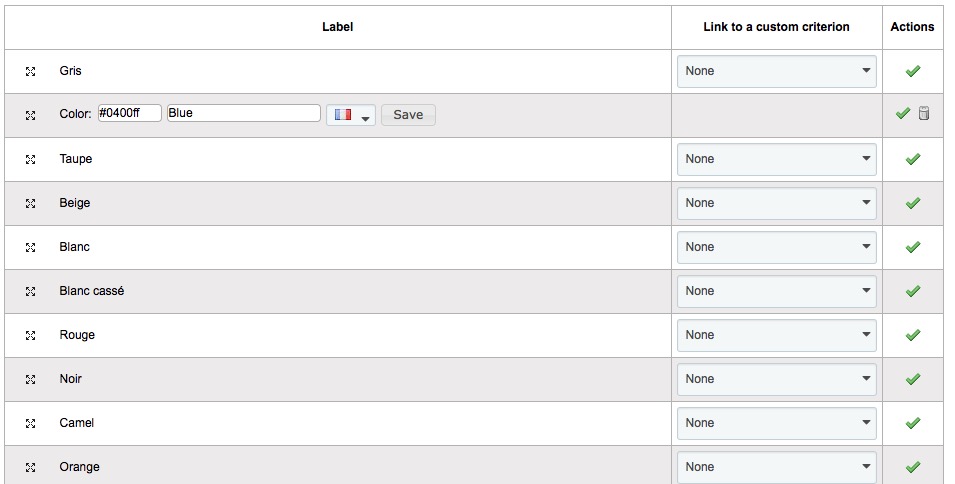
All you need to do now is link each color variant with the corresponding custom criterion.
When a customer selects Blue as a criterion, Advanced Search will then show all the results for blue variants that have been assigned to the criteria.
D- General Settings
I- Enable Cache
![]()
This allows you to activate the Advanced Search cache, which is independent to the cache for your shop.
We recommend that you activate the cache as of the production launch of your shop
II- Activate automatic indexing when adding/editing/deleting items (may slow down your back-office)
![]()
This allows you to automatically launch indexing when you add, edit or delete an item from your search engines.
Re-indexing is only carried out on the search engine concerned by the modification
III- Activate the active/inactive status sync of items with your criteria
![]()
This allows you to retrieve the status, active or inactive, of each of the criteria for your shop on re-indexing. Link to Custom Criterion
IV- Display Products from Sub-Categories
![]()
This allows you to change the display of the Category pages on your shop. Once activated, it allows you to display the products associated with all the sub-categories for the current category.
This display for products in child categories is provided outside of context search. Once the search has been launched, the results settings in the search engine configuration will be used as a template (search all sub-category levels)
V- Advanced Styles (CSS)

This allows you to add the CSS code so that you can customize Advanced Search (advanced user).
VI- Scheduled Task
This allows you to retrieve the URLs that launch a re-indexing job for one or all the search engines.
These links are to be used when setting up CRONjobs.
VII- Maintenance
1) Clear Search Engines Cache
![]()
This allows you to clear the cache for all your search engines.
2) Re-index all search engines (CRON alternative)
![]()
This allows you to start immediate re-indexing of all the search engines without needing to set up a CRONjob.
3) Delete All Search Engines
![]()
This allows you to delete all your search engines.
